Ultra Post: Help from Friends, Hurricane Issac, Electrical, Living on 15 Amps of Power!
It has been awhile since my last post but a lot has happened and I have lots of pictures for you to enjoy. Since my last post I have gotten more done on the power closet, ran some plugs and switches, added the breaker box, installed the a/c, the shower is installed, on demand hot water heater, stairs inside, loft installed, cooking solved, oak floors in(mostly), fridge, internet and TV solved, temporary pallet stairs(outside), got a cat, and oh yeah, we had a hurricane named Issac!! Plus I have had tremendous help from friends that gave me lumber, random things like windows, and loans of much needed power tools!
The biggest challenge was trying to figure out how to live in this house while still finishing everything and how to power everything with a 15 amp extension cord tethered to my friend Keith's house. I won't technically be off the grid yet but I am just barely dangling on here people! The main thing to get working before I moved in was the a/c. This is south Louisiana, and it will be above 90 probably till November. But who knows we may actually have a fall this year. We had a few nights in September that got in the 60s! But the a/c is 6 amps so next was to get a light(milli amps) and a fridge(4 amps). So that's 10 amps + milliamps. Plus I have the laptop, a radio, speakers, and the TV antenna has a power source to increase the signal a little bit. So all of those don't add up to much power. So I have succeeded in keeping power consumption below the 15 amp limit. I just have to basically unplug the house to run the table saw(14 amps). I have to be consciously aware of everything power related. It's really not hard to remember though.
All of the cooking, washing clothes and dishes, water source is all taken care of. There is a well on the property that provides enough pressure to take a shower. I have a camp chef outdoor on demand water heater to take some nice hot showers. And that little thing works very well. It really can get the water scalding hot, too hot. I wash all my clothes by hand in a big metal washtub and hang dry them on a clothesline. It sounds like it's a lot of work but it's really not if you wash on a consistent basis. I save all of my whites and do them on one day. Any work clothes that get all sweaty usually get washed the day of use. Cause living in a tiny house there is no buffer for smelling dirty clothes! lol. Washing dishes is also done by hand and outside for now until I get the kitchen sink hooked up. And so I don't contaminate the soil or groundwater, I have all organic soaps for dishes, shampoo, conditioner, and organic toothpaste. You can't let any sulfates or fluoride into the groundwater. Since I want to farm the land as organically as possible, the water has to be pure of these things. Eventually all my grey water will be collected and filtered in a reed bed system for reuse in the garden.
Cooking is done all on the front porch with my camp chef oven, stove, and grill. That thing works great! I love that thing! I would definitely recommend this for other tiny house dwellers. It cooks very fast and even. One small disposable propane tank lasted for three weeks of cooking. Tea every day plus rice, noodles, stir fry, burgers. I still have not used the oven but the grill and stove work flawlessly.
The fridge is a Koolatron DC fridge (4 amps). I bought a converter so it can run on AC power. It is one of those fridges you can put in a car for long trips. But it is the lowest power fridge I could find. It is about the size of an ice chest but it sits upright like a normal mini fridge. I keep eggs, butter, cheese, milk, bread, beer, etc., in there pretty much constantly and have had no problems. When I have solar power I will put a timer on the fridge so it will not run constantly. It is not loud at all and I don't even notice that it's on. The plug can actually be reversed and you can use it to keep things warm. But I don't have a use for that function. I have had the fridge off for a few hours at a time and everything inside was still cold so it holds it's cooling capacity pretty good.
The air conditioner is working good as well. It is an ice box in that house at night and I barely have insulation. All I did was use can foam to seal any gaps. And it doesn't take long for it to get cool in there. But it does take a little bit longer to cool the loft. But once I have the insulation and the interior wall panels up I should not have any problems. The good thing about building with pallets and the location of the a/c unit is that the cavity in a pallet is a perfect little tunnel for air to flow through. I plan on diverting some of the a/c output flow through the pallets up to the loft to cool it down faster.
So far living tiny and almost off the grid has not been too difficult. It is a lifestyle change and probably most people would have a hard time doing it but I have made some strides in providing myself with some entertainment dangling off the grid. I have internet and TV! I have a USB TV tuner installed on my laptop that is now working thanks to the HDTV antenna that I built. The $40 flat panel antenna from the store would not pick up any channels at all. So I had to look for a better longer range antenna. I am about 50 miles from the nearest tower so I had to come up with another plan. Either buy the $125 antenna on the internet or figure out a way to build one myself. So thankfully YouTube has come to my rescue. It turns out with a little copper wire, some PVC, nuts and bolts and a 75 ohm matching transformer you can build one yourself. I will add the link for those videos and plans here:
Now I get 15, very clear, free over the air HD channels. The over the air HD signals are actually clearer than what you can get with the cable company. The cable company filters the signal that goes to their customers. So far I haven't had any signal drop. I do have to move the antenna slightly every now and than to get a certain channel. But this antenna works better than any other antenna I have ever had and it was about $20 in supplies.The USB TV tuner was made by a company named Diamond Multimedia. The name for the particular tuner that I bought is called the ATI TV Wonder HD750. It was a bit confusing getting it set up. The wizard is a little weird and the instruction manual is pretty much useless. But if you are handy you can figure it out. One of the best things about it is that you can pause live television and schedule to record shows, it has a remote, tunes in radio stations as well and comes with an a/v cable and an antenna (I'm too far from towers for that little antenna to work though.) Which is why I built the antenna!
HDTV Antenna (whisker model) 6 channels
Added fractals to the whiskers and a steel mesh panel behind it. Now I get 15 channels!
A little temporary entertainment center.
With a little help from my friends
There is no doubt that I have had tremendous help with this whole project from family, friends, even students. But I need to give a shout out to a few people that have helped me recently and show my appreciation for them.
First of all, I would like to thank my friend Adrienne for letting me stay in the apartment behind her house this summer while I got my house livable. I can't express how much you have helped me out this summer! Thank you, thank you thank you!
Next, I would like to thank Carolyn Webb Moore for introducing me to her father Russel Webb! He gave me a whole truck load of really nice wood like oak and cypress! He even said one of the cypress beams he gave me he pulled from some old slave quarters! He is a master carpenter and the building you see below is his old sawmill that he built completely from reclaimed materials from jobs he had done over the years. It was great to hang out there with him and talk about where all of his wood came from. He had many stories and it was great day and I am extremely thankful for his gratitude and compassion for what I am doing. The other pictures below is everything he gave me that day. Some of those beams have got to be expensive! Thank you!!
His old barn.
Mr. Webb's old sawmill from reclaimed wood.
A truck load of good wood! Thanks Mr. Webb!
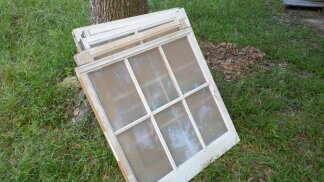
Some old windows.
4'x8'x1" sheet of plywood
Big and thick beams!
Lots of cypress!
I would also like to thank Terry and Marie Looney for loaning me some power tools! The table saw and miter saw have proven to be extremely helpful. They also lent me a jigsaw and their shop vac and some other little nic nacs. Thank you so much and your tools will be returned soon!
And last but not least I would like to thank my dad, once again, for helping me get the electrical in. He was the reason I was able to comfortably live in this unfinished house. I think it would have taken me a lot longer to figure out the breaker box and especially the 3-way switches! I had so much trouble with the 3-ways but my dad guided me through it over the phone and I eventually got it but not without lots of trouble. I was at the point where I thought I had everything wired correctly and it turns out I did but, I bought a bum compact florescent light! That would be my luck to buy the one brand new light bulb in the store that doesn't work! But thanks dad! Love you!
Hurricane Issac
Now without further anticipation...the question. How did the tiny house do during Hurricane Issac?
Well, long story short it did fine, flawless. Which is great news! I was worried that it could have tipped over or a tree could fall through. But there was hardly any limb debris and the construction debris didn't even budge. I also coin it up to the long talk I had with ole' Mother nature! lol! I have a couple of pics below that show it boarded up the day before an then another of the morning after Issac blew through. But since the house handled the winds flawlessly it now has a name...'The Tiny Fortress of Solitude!' (I am kind of a Superman fan!)
The house boarded up before Hurricane Issac!
The house the morning after the storm and not a thing wrong with her!
Shower
The shower I have explained a little bit in the past but I will sum it up for those that are just reading my blog for the first time. I got the shower base, faucet and shower head at World Market. It was an all in one outdoor shower. I actually bought the last one they had in the store. It was the floor model so I got it for about $90 instead of $150! The base with drain is an Aquatic 32x32 shower pan that I bought from one of big box stores. I had to cut the shower base from World Market to fit inside the shower pan. Then I reinforced the parts I cut to have stable footing. But this reinforcement was still not enough to prevent the outdoor shower base from moving and squeaking. The solution was to coil a rubber water hose in the shower pan and set the outdoor shower on top of it. After I did that it has never moved or squeaked.
Cut and fit shower into the pan! And it's being attacked by love bugs which like to swarm anything that is white.
I found a new spot for the shower. I was going to put it all way against the back wall but it was just to tall to fit under where the loft is going to go.
Shower drain from underneath the house.
The walls for the shower are 8' corrugated aluminum panels. With roof flashing in the corners all seams filled with butyl tape which is used for metal roofing to keep the water from going between the gaps. The panels are screwed to the walls with roofing screws with the rubber gasket.
The base with new walls mostly in.
It now has hot water and nothing leaks. For now I have a shower curtain but I might put a glass door in eventually.
I also put the drain in place and obviously cut the holes needed for that and the water intake. All of the water is run by hoses from the well on the property to the water heater to the shower. Everything has been working very well once I learned the nuances in the system. Now I have a guaranteed hot shower everyday!
Power Closet
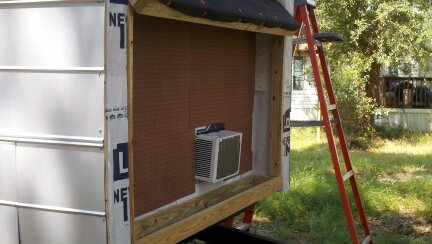
A/C installed!
I added peg board to go in the power closet. I thought it could be useful for hanging things in the closet.
Staring to build the closet doors!
I stapled mesh wire to the bottom of the closet to allow things like the a/c to vent.
Turned these two windows into doors!
Open
Closed with latch. I am going to eventually paint or frost the windows with some stenciled fluer de lis or something.
Breaker box and reverse plug for the extension cord installed.
More Electrical work
A few plugs.
Light for front room.
Installed a/c from the inside with its own plug.
Front light with temporary fixture.
We have light!
Front door 3-way switch.
Loft 3-way switch.
That one light really lights up the whole house at night. I have no trouble seeing at night.
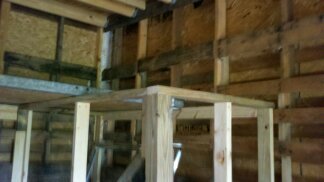
Framing for bathroom, closet, loft and stairs
Started to add more framing around shower and for the loft. The loft or bed base is taken from the steel bed frame that my dad built for my bed at my old house. I just knocked the legs off of it and bolted it to the top of the framing for the bathroom, hallway and closet.
More framing goes up!
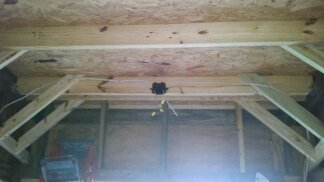
A look at the loft.
There are osb panels that fill the bed frame to support the mattress.
My kitchen sink. I bought as an outdoor sink to go on my balcony at an old house. The apartment I rented didn't have a kitchen so I bought this online somewhere for about $150 to wash dishes. But now it's going to get a good cleaning and polishing and going to go in my kitchen!
I started on the loft stairs.
The tread is oak and the riser is cypress.
This is what the stairs look like now with them trimmed up and the new floors that are in makes it look a little more homey! The rest of the stairs is going to be a box step at the top of the last stair and a ladder the rest of the way to the loft.
Sammy and the chicken:
My new cat Sammy. aka future field mice killer! Thanks Carrie!
Sammy settling in well!
Sammy stalking the chicken!
I think they are getting along better now!
Ever seen a chicken in a tire? Well now you have! She has been laying her eggs in there!
Outdoor Kitchen
My cool little outdoor kitchen. Eventually I will raise this a bit so I don't have to bend over.
First night and meal in the tiny house. Venison burgers!
My new cast iron tea pot! Another World Market find!
Oak Floors
The floors were found on Craigslist by my dad. They are reclaimed oak. He wanted some for a project but gave me the rest of it. And I had more than enough to finish the whole house. I will use the rest on parts of the walls and the bathroom floor. I still will have to sand it and restain it or seal it. I didn't have that special hammer gun to drive in the nails at the perfect angle. I used the old fashioned hammer and nail and then drive in the rest of the nail with a philips screwdriver. I had some issues with gaps and didn't get everything as perfect as I wanted but I think it turned out pretty good. Even if I didn't do anything else to these floors they would still look pretty darn good.
Stack of oak flooring!
Underlayment
I started on the back wall in the hallway.
Then started on far left wall.
Making progress!
My papasan chair. Eventually there will be a built in couch, bed , and storage in that space.
Looking good!
From loft.
Random
My temporary pallet stairs!
My fresh water storage for now. It lasts about three days before it needs to be refilled.
Fresh water storage that will be in the bathroom for washing hands. It's not going to stay on that table it will eventually have a sink under it and then drain to the outside and eventually to the grey water recycling system. This was another find from World Market!
But that is all for now. Next I will be finishing up electrical stuff, doing some insulation, wall bolts, gutter, kitchen sink, bathroom floor, under loft framing, stairs, closet stuff, hopefully some interior walls and ceiling and other random things I'm sure.
Howdy, something about your power usage didn't sound quite right to me. I know that a you can generally split power usage between lower power usage (small electrics, like cellphones, laptops and powered antennas) and high power (power tools, ACs) Generally speaking you can ignore the low power and only run one high power at a time on 15 amps.
However, your little fridge running on 4 amps didn't make sense to me, so I looked it up. It only uses 4 amps at 12 volts, or about 48 watts, or only about .4 amps at that is NOTHING for grid power, and still fairly reasonable once times for off grid power. I hope that .4 gives you a bit of breathing room in your energy usage. Unfortunately, it won't save you from unplugging the house to run the power tools.
Yeah. You can only directly compare amps on systems were the voltage is constant. Once you start doing conversions, it is best to figure everything in watts. It makes the comparisons a lot easier to work with. This will become a lot more critical as you attempt to size a solar system for off grid usage. Everything is about Watt*Hours. Learn about them and how to get them from the tags on your devices to make an intelligent decision about your off grid purchases.
It's a great project and I love reading about it. The best of luck with the rest of it.
Yeah I know you have to add everything up in watts to size your solar system. I think I have a total of about 600-650 watts if I add all appliance and electronics up. Of course that doesn't mean everything will be running at the same time. I think I will get 1kw in solar panels and about 1k-1200 amp battery bank. That should be enough I think. If you consider discharge rate, sun hours, added battery capacity for non sunny days. Plus a backup generator just in case to top off the batteries if necessary. If you see anything wrong with that please let me know your concerns. But thank you I really appreciate help and feedback!
It's not just about watts, but about watt*hours. You need to look not just how much power your devices use, but how long they actually run.
Consider this: A small window AC unit, which should be enough for your small home I would think runs at about 500 watts. Let us also assume that because of the thermostat, it is only running for 1/4th the time. That means on a given day, it needs ( 500 * 24 * 0.25) 3000 Watt*Hours of energy a day. Now, you mentioned 90+ until november. Looking at an this website (http://rredc.nrel.gov/solar/old_data/nsrdb/1961-1990/redbook/atlas/Table.html) and plugging in the variables for average sun, moth of November, and a flat plate collector (aka, a solar panel) tilted at latitude (best static location), I see m ost of Luisiana is in the lighter green area. That gives you a value of ~4 kWh/m^2/day. That may be an intimidating unit, but all panels are rated at 1 kWh/m^2, so that means you can expect an average daily generation of 4 times the panels rated value. To run the AC with 3kWh/day, you need ( 3000 / 4 =) 750 watts of solar. Not to shabby.
You will also need about 3kWh per day of battery that you want to even out. I heard a good rule of thumb is to have enough power for 7 days, but it is up to you. Less battery is cheaper, and they don't last forever, but increases how often you need to run your generator. Let us assume you are being good to your batteries and never run them less than half charge, and you're using reasonable inexpensive deep cycle marine or golf cart batteries (~ $75 in most big box stores, but there most likely is a "core charge" for not recycling your old ones, which you don't have yet.), These batteries average about 100 A*Hs at 12V or 200 at 6., so you'll want ( 3000 W*H * 7Days / ( 12V * 100 Ah * .5) = ) 35 batteries! Yikes!
Hopefully this gives you something that you can work with and some understanding. Good Luck!
Cool! The a/c is 515 watts and no automatic thermostat. Which is why I will have to put a timer on it to hopefully only need to run 15 minutes per hour when I am home and obviously when it's hot outside. I am hoping that my extreme insulation measures will help out with doing that. As for the batteries I am going to try to get a battery that is 250-300 ah so I don't need so many batteries. I wish I could buy the batteries all at one time because I have heard that is best but I don't think my pocketbook can handle that all at once so I am just going to have too buy a few at a time and add on when I can. And I hope once I have enough batteries I can only discharge 20% to lengthen their life.
Very impressive! As always, really enjoyed reading your blog. So glad everything is working out for you. Looking forward to seeing the finished project!
Hey sgrin... my daughter and I live in Denham Springs and are planning to build a tiny house very, very soon. Is there any way we could make a run to Abita to see your place? I would really appreciate it... getting to speak with someone who has actually gone through the process would help a great deal. I went to a "Tiny House Workshop" with Dee Williams last summer in Houston and have been involved in 'green' building, sustainability, etc. for a long time. Nice to find like minded folks in Louisiana! They are usually all in Austin, Portland or the east coast :-)
Great job on your blog with the photos, etc. I have a website "www.cobbithouse.com" that serves as an information site for cool projects, networking, building techniques, other folks in the eco build movement... check it out. I'm going to add a link to your blog as your approach is very realistic and practical. LOVE pallet reuse! :-)
Have a blessed day and when you can please email me at "cobbithouse@gmail.com" or "swampchicka@gmail.com" Would love to "talk shop" ... I'm learning banjo too... so cool that you play! Have a great day and Happy New Year :-) Roze


Howdy, something about your power usage didn't sound quite right to me. I know that a you can generally split power usage between lower power usage (small electrics, like cellphones, laptops and powered antennas) and high power (power tools, ACs) Generally speaking you can ignore the low power and only run one high power at a time on 15 amps.
ReplyDeleteHowever, your little fridge running on 4 amps didn't make sense to me, so I looked it up. It only uses 4 amps at 12 volts, or about 48 watts, or only about .4 amps at that is NOTHING for grid power, and still fairly reasonable once times for off grid power. I hope that .4 gives you a bit of breathing room in your energy usage. Unfortunately, it won't save you from unplugging the house to run the power tools.
So if that's right I guess I will have an extra 4 amps of wiggle room! Thanks. I didn't even think about calculating that when converting it to AC.
DeleteYeah. You can only directly compare amps on systems were the voltage is constant. Once you start doing conversions, it is best to figure everything in watts. It makes the comparisons a lot easier to work with. This will become a lot more critical as you attempt to size a solar system for off grid usage. Everything is about Watt*Hours. Learn about them and how to get them from the tags on your devices to make an intelligent decision about your off grid purchases.
DeleteIt's a great project and I love reading about it. The best of luck with the rest of it.
Yeah I know you have to add everything up in watts to size your solar system. I think I have a total of about 600-650 watts if I add all appliance and electronics up. Of course that doesn't mean everything will be running at the same time. I think I will get 1kw in solar panels and about 1k-1200 amp battery bank. That should be enough I think. If you consider discharge rate, sun hours, added battery capacity for non sunny days. Plus a backup generator just in case to top off the batteries if necessary. If you see anything wrong with that please let me know your concerns. But thank you I really appreciate help and feedback!
DeleteIt's not just about watts, but about watt*hours. You need to look not just how much power your devices use, but how long they actually run.
DeleteConsider this: A small window AC unit, which should be enough for your small home I would think runs at about 500 watts. Let us also assume that because of the thermostat, it is only running for 1/4th the time. That means on a given day, it needs ( 500 * 24 * 0.25) 3000 Watt*Hours of energy a day. Now, you mentioned 90+ until november. Looking at an this website (http://rredc.nrel.gov/solar/old_data/nsrdb/1961-1990/redbook/atlas/Table.html) and plugging in the variables for average sun, moth of November, and a flat plate collector (aka, a solar panel) tilted at latitude (best static location), I see m ost of Luisiana is in the lighter green area. That gives you a value of ~4 kWh/m^2/day. That may be an intimidating unit, but all panels are rated at 1 kWh/m^2, so that means you can expect an average daily generation of 4 times the panels rated value. To run the AC with 3kWh/day, you need ( 3000 / 4 =) 750 watts of solar. Not to shabby.
You will also need about 3kWh per day of battery that you want to even out. I heard a good rule of thumb is to have enough power for 7 days, but it is up to you. Less battery is cheaper, and they don't last forever, but increases how often you need to run your generator. Let us assume you are being good to your batteries and never run them less than half charge, and you're using reasonable inexpensive deep cycle marine or golf cart batteries (~ $75 in most big box stores, but there most likely is a "core charge" for not recycling your old ones, which you don't have yet.), These batteries average about 100 A*Hs at 12V or 200 at 6., so you'll want ( 3000 W*H * 7Days / ( 12V * 100 Ah * .5) = ) 35 batteries! Yikes!
Hopefully this gives you something that you can work with and some understanding. Good Luck!
Cool! The a/c is 515 watts and no automatic thermostat. Which is why I will have to put a timer on it to hopefully only need to run 15 minutes per hour when I am home and obviously when it's hot outside. I am hoping that my extreme insulation measures will help out with doing that. As for the batteries I am going to try to get a battery that is 250-300 ah so I don't need so many batteries. I wish I could buy the batteries all at one time because I have heard that is best but I don't think my pocketbook can handle that all at once so I am just going to have too buy a few at a time and add on when I can. And I hope once I have enough batteries I can only discharge 20% to lengthen their life.
DeleteVery impressive! As always, really enjoyed reading your blog. So glad everything is working out for you. Looking forward to seeing the finished project!
ReplyDeleteAndrea
A Mini Storage
Thanks Andrea! And thank you for the storage space for the last seven months!
DeleteThanks Andrea! And thank you for the storage space for the last seven months!
DeleteThanks Andrea! And thank you for the storage space for the last seven months!
DeleteHey sgrin... my daughter and I live in Denham Springs and are planning to build a tiny house very, very soon. Is there any way we could make a run to Abita to see your place? I would really appreciate it... getting to speak with someone who has actually gone through the process would help a great deal. I went to a "Tiny House Workshop" with Dee Williams last summer in Houston and have been involved in 'green' building, sustainability, etc. for a long time. Nice to find like minded folks in Louisiana! They are usually all in Austin, Portland or the east coast :-)
ReplyDeleteGreat job on your blog with the photos, etc. I have a website "www.cobbithouse.com" that serves as an information site for cool projects, networking, building techniques, other folks in the eco build movement... check it out. I'm going to add a link to your blog as your approach is very realistic and practical. LOVE pallet reuse! :-)
Have a blessed day and when you can please email me at "cobbithouse@gmail.com" or "swampchicka@gmail.com" Would love to "talk shop" ... I'm learning banjo too... so cool that you play! Have a great day and Happy New Year :-) Roze