Well, a long story short I finished building the trailer. I spent about an entire week working like mad for twelve hours a day trying to complete this thing before my Mardi Gras break was over and I had to go back to work. You see that little warning disclaimer in the headline of this post? Warning: Do not try this at home! I am very serious when I say I wouldn't recommend it. On the difficulty level it is probably a 8 or 9, it's not rocket science or anything but it is a serious undertaking. If you don't have any welding experience and no one to take you under his/her wing. Don't even try it. I am just lucky that my dad has every tool known to man that I could use to help me build this thing. And not to mention my father's brain to pick when I had a question or a concern or needed a second opinion. Let's take the first picture below as an example. Those are the axles hanging from the frame. Well, before we hung the c channel steel brackets to the hangers on the springs we just welded the hangers to the frame. What is wrong with that you say? We tried to put the tires on and the tire was running into the frame and I couldn't even get the tire on. So I had to cut the hangers loose and fabricate the c channel steel brackets that would hang the axles lower so the tires would fit. That mistake right there cost me almost a whole day.
 |
| Axles with new brackets for the hangers to lower the axles from the frame. |
But hey, we got those pesky axles on and by that time I could see it was starting to look more like a trailer. Next we got the tongue of the trailer attached. It takes a second to get it up in the air, clamped to the frame, and lined up, but it wasn't so bad.
 |
| The trailer now has a tongue! |
Now for more work on supporting the axle brackets with angle iron in between them so the brackets would not bend whenever it was being transported. I also primed the hubs and some of the other axle supports at this point.
 |
| Primed hubs and supports. |
 |
| Primed supports and all the spots I welded to prevent rust. |
Now time to put on the wheels. You may have remembered that these axles are mobile home axles which are different from standard wheels and axles you would see on a normal utility trailer. When you put mobile home tires on the hubs the lug nuts come with a bracket that clamps the wheel to the hub. Now you have to get these tight or you might have a wheel come flying off on the road!
 |
| Got the wheels on. Luckily my dad's ginormous lift was able to jack up the entire trailer to make this step easy. |
Originally, we got two standard axles instead of one brake and one standard axle. My dad went back to the guy you sold us the axles and just traded one of the standard axles for a break axle. Each axle was $75 each and each tire was only $25 each! What a deal when you see what the prices are for a brand new axle! The savings are tremendous. Go to the yellow pages and look up mobile home movers. These guys have this stuff just lying around. Be careful about putting these axles on your trailer because some states won't register a homemade trailer with mobile home axles because they consider these axles to be used only temporarily while moving mobile homes. But in all honestly they will work fine. You only need to cut them down so they fit the 8 ft width limit. And in my case in Louisiana, it is not an issue. I'll get more into the registration process later in this post.
 |
| Brake axle |
 |
| Standard axle |
It moves! We hooked it up to the truck and put in the parking lot next to my parents loft to prep and start painting the first coat.
 |
| Truck and trailer unite! You may notice the trailer looks a little tilted. That's because we don't have the new ball mount in yet and this is the old one. |
 |
| Rear view |
 |
| Underneath |
 |
| Covered tires to prep for painting. |
 |
| First coat: Rustoleum exterior gloss paint. |
 |
| Second coat |
The lights, the infamous lights...oh how I hate you!
I thought this was going to be one of the easiest parts to building this trailer. Boy was I wrong! I purchased a light kit from Buccaneer Truck Stuff in Alexandria, La. These guys have all the stuff you need if you are building a trailer. I started putting on the rear lights and realized the way the frame was done I couldn't mount the lights evenly on both sides. So I had to fabricate some mounting brackets for the lights. That was actually the easy part. For the front side clearance lights I had to drill through the frame and attach the lights with a nut and bolt.
 |
| Front side amber clearance lights(on each side). Tractor Supply $5 each. These are wired into the brown wire on each side. |
 |
| Rear LED lights with signal, side view, and license plate light. |
To wire up all the lights and the brakes you need a 7 way RV plug and the attachment for that on you truck. Luckily my truck had that already. But be sure to check that all the pins are not bent out of shape. My pin for the ground cable(white cable) was bent and nothing was getting power to the lights (Thanks to Danny at Buccaneer for figuring that out!). Then after everything was wired up the lights worked for a second but then all of a sudden we had no light. We checked the fuses but couldn't see that any were burned out. We were at a loss. We had double checked everything to figure out that it probably was a fuse but couldn't figure it out. So we carefully towed the trailer over to Buccaneer to see if Danny could figure it out. Turns out that one of the fuses for the lights was wrong. There was a 15A fuse where a 20A fuse should have been. After Danny quickly figured that out we were in business. We also got the new ball mount that will sit the trailer even with the road and not tilted like in the previous picture. Thanks Danny!
At this point we were racing against the clock. It was about 2:30 on Friday afternoon and I wanted to get the trailer inspected by the state police before 5. But we still had to wire one more side clearance light and weld on the trailer tow chains to the tongue. So while my dad wired up the light I welded the chains on and touched it up with paint.
To register a trailer (in Louisiana), you need to get a homemade trailer affidavit from any Louisiana state police office and get it signed and notarized by any state certified notary. Then you have to bring it back to the state police office and turn the affidavit in so they can inspect and stamp the serial number on your trailer. They will literally bring out a hammer and pound it in on the tongue next to the coupler. I didn't know how strict the inspection process was going to be but the officer just said, "Now that's a trailer!" Then he asked me if the lights worked and I said yes. He didn't even make me turn them on. He then pounded the numbers in and handed me my receipt to take to the DMV. That was it! At this point it was 4:30. I made it just in the nick of time! The officer said my receipt was proof that it was registered and that I could go ahead and move it to take it to the DMV of my choosing. That was what I needed to hear to go ahead and make the trek home 3 1/2 hours away.
 |
| Here is the completed trailer all hooked up and ready for the road! |
 |
| Lookin' good! |
So I embarked on my first journey on the road with this thing. All was fine for the first two hours of the trip. I remember hitting some bad bumps after I crossed the Mississippi bridge in Baton Rouge. Then some guy pulls up on the side of me saying that something fell off my trailer. Well, it was already dark so I had to stop and pull over to see what was wrong. One of the supports between the axles was gone and some others were loose. But the main thing was one of the c channel welds snapped! This is the warning I put in the headline of this post. If you don't do this right the consequences could be drastic. From Baton Rouge to home I drove about 40mph with my flashers on. What should be an hour trip from Baton Rouge took two and a half. It was extremely stressful and I don't recommend it! These next few pics are the trailer the next day after I thankfully made it home.
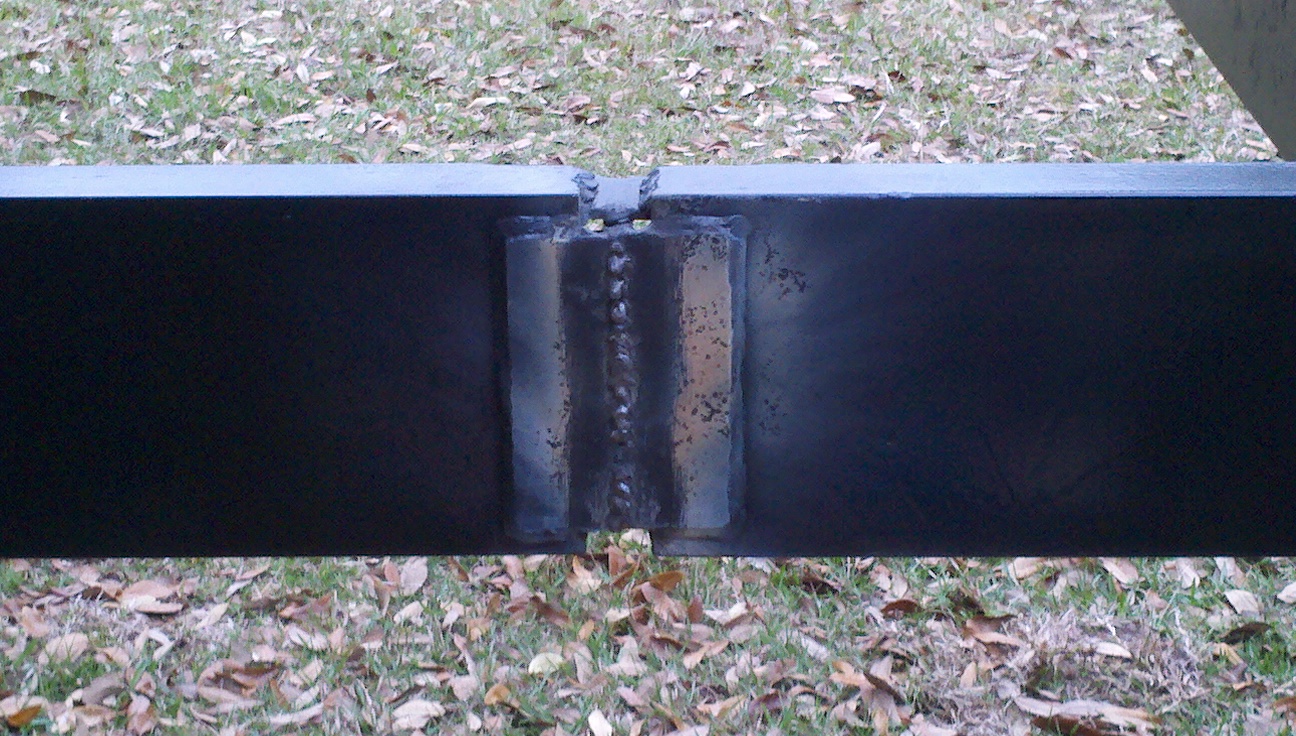
 |
| Broken weld on the side of the frame. Not good! |
 |
| Missing axle support |
 |
| Broken droopy trailer :( |
So now I have to repair this somehow...hmmm?
Well, that brings my friend Keith to the story. He also has every tool known to man. But more importantly a welding machine. He was kind enough to let me use his shop and use whatever I needed to make this trailer right again. So all day Sunday and Monday morning I welded and welded. Fixed the broken stuff, re-welded spots I thought might be a risk, and added some new supports to weak spots. I also had to rewire some of the light because the wires snapped when the frame broke and drooped down.
 |
| Re-welded some key structural spots. |
 |
| This weld actually broke as well but the bolts on the inside kept it together. |
 |
| Re-welded axle supports. |
 |
| This was the main brake in the frame. There is now a 1/4 inch steel plate about a foot long behind this welded into place for added support. |
 |
| She's back in business! Re-welded and supported, re-painted, and the lights work again! Thanks Keith! |
An extra thing I did not mention was what I was using to jack up this heavy trailer with! On most trailers people permanently install a 2,000 or 5,000 pound jack onto the tongue and just wind it up to the height they need it. But I chose to buy what is called a farm jack and I am so glad I listened to my dad on this purchase. It is so versatile. Not only can I lift up any part of the trailer(not just the tongue), but this will become an invaluable tool for life on my farm. This thing could get my truck out of a jam, uproot small trees for clearing land, and even stretch wire for fencing. In fact I would not have been able to get the trailer repaired if I didn't have this jack. It helped me get the side of the trailer level so I could weld it back together.
.jpg) |
| 48" tall 7,000 lb. farm jack |
After all the repairs were done I took my receipt I got from the state police and took it to the DMV. I gave it to the person working there and she just needed my license and money for fees. There is a handling fee, registration fee, and license plate fee(they give you three choices: Re-register every year in June($10), every four years($40), or a permanent registration for ($70). I chose the yearly fee because I didn't have enough cash with me. In all it cost me $41.50. So bring enough cash for whatever choice you make. The only other questions she asked were the color of the trailer and would it be carrying more or less than 500 lbs. They didn't even look at the trailer. I guess the receipt from the state police is enough for them. But she gave me my license plate on the spot and now I have a registered 'utility trailer.' Now it's finally time to start building the house on top of it!
So there were some ups and downs in building this but I finally did it and I can't really believe it myself! My next post will be installing the floor frame and sub-floor sheathing.
Wish me luck!


Yep, Danny rocks! Looks awesome!
ReplyDeleteyes he does! thanks!
DeleteMust say I am proud of Ben...he worked like a Trojan. Many thanks to Danny and Keith...saved the day. :-) 'The Dad'
ReplyDeleteThis is one of the most interesting blog posts I've ever read. Thanks for sharing and great job!
ReplyDeleteWhy thank you! What did you find that was so intriguing?
DeleteI've been following your blog for a little while myself, and I gotta say, it is not only a great read/follow, but also very informative for the DIY guy. I hope to see you through the end of this journey, and quite possibly, the beginning of my own as well =)
ReplyDelete